2. Preparing your workstation
2.1. Red Hat subscriptions
-
Some deployments would require a Red Hat Customer Portal account that has appropriate subscriptions. This is not required for the playbook themselves.
|
Note
|
Red Hat employee subscriptions can be used |
2.2. AgnosticD with Execution Environment
It is possible to run agnosticd with containers. This way you just need a container runtime, usually podman for Linux and Docker for mac. The tools/execution_environments directory contains builds scripts for our supported Execution Environment (EE).
Ansible Execution environments
Naming convention
Supported Execution environments for agnosticd should be named using one of the following conventions:
-
ee-<python virtualenv>- Execution Environments for legacy python virtualenvs available on ../virtualenvs Ex:ee-ansible2.9-python3.6-2021-11-30 -
ee-<purpose>- execution environment customized for a particular purpose. For example, the<purpose>string could be to support a particular version of a cloud provider different from what is included in the multi-cloud environment. Ansible version should be 2.9+ and python version should be 3.6+. Ex:ee-multicloud. Version can be added as tag using semantic versioning.
Community Images (recommended)
Requirement:
-
podman or docker installed and configured on your workstation.
-
ansible-navigator installed, see below for instructions
Available public images are listed on Quay here:
Private Images (reference only)
Requirement:
-
podman or docker installed and configured on your workstation.
-
ansible-navigator installed, see below for instructions
-
access to private registry image-registry.apps.open.redhat.com:
-
oc loginto the OCP4 cluster hosting the registry
-
Supported images, based on supported Execution Environments, are available in the private registry image-registry.apps.open.redhat.com.
To login to the registry, get a token using the OCP client as follows:
podman login -u unused -p $(oc whoami -t) image-registry.apps.open.redhat.com
List of support EE can be found on the production clusters by looking at images in the agnosticd namespace.
As of 2022-03-07, the list is:
oc get is -n agnosticdNAME IMAGE REPOSITORY TAGS UPDATED ee-ansible2.9-python3.6-2021-01-22 default-route-openshift-image-registry.apps.ocp-us-west-2.infra.open.redhat.com/agnosticd/ee-ansible2.9-python3.6-2021-01-22 latest 6 hours ago ee-ansible2.9-python3.6-2021-11-30 default-route-openshift-image-registry.apps.ocp-us-west-2.infra.open.redhat.com/agnosticd/ee-ansible2.9-python3.6-2021-11-30 latest 4 hours ago ee-azure_open_envs-ansible2.9-python3.6-2022-01-10 default-route-openshift-image-registry.apps.ocp-us-west-2.infra.open.redhat.com/agnosticd/ee-azure_open_envs-ansible2.9-python3.6-2022-01-10 latest 6 hours ago ee-equinix_metal-ansible2.9-python3.6-2021-07-02 default-route-openshift-image-registry.apps.ocp-us-west-2.infra.open.redhat.com/agnosticd/ee-equinix_metal-ansible2.9-python3.6-2021-07-02 latest 6 hours ago ee-equinix_metal-ansible2.9-python3.6-2021-11-03 default-route-openshift-image-registry.apps.ocp-us-west-2.infra.open.redhat.com/agnosticd/ee-equinix_metal-ansible2.9-python3.6-2021-11-03 latest 4 hours ago ee-multicloud default-route-openshift-image-registry.apps.ocp-us-west-2.infra.open.redhat.com/agnosticd/ee-multicloud v0.0.4,v0.0.3 7 hours ago
ansible-navigator
-
Upstream project: https://github.com/ansible/ansible-navigator
ansible-navigator is the preferred tool for running AgnosticD. With this CLI tool, you can use the supported agnosticd images. It has both a static stdout mode and an interactive mode.
See Upstream project: https://github.com/ansible/ansible-navigator for complete instructions.
You can use requirements-ee.txt or just install it with pip:
pip3 install 'ansible-navigator[ansible-core]'
To use Execution Environments, you need to run agnosticd with ansible-navigator.
# Run from agnosticd directory
cd agnosticd

ansible-navigator run ansible/main.yml \
--eei quay.io/agnosticd/ee-multicloud:latest \
-e @ansible/configs/test-empty-config/sample_vars.yml|
Note
|
On Mac, you probably want to change the container engine to docker, using --ce docker
|
ansible-navigator run ansible/main.yml \
--eei quay.io/agnosticd/ee-multicloud:latest \
--eev ~/secrets:/secrets \
-e @ansible/configs/test-empty-config/sample_vars_ec2.yml \
-e @/secrets/dev.yml
|
Note
|
Add --mode stdout option to mimic ansible-playbook simple output.
|
# Run from agnosticd directory
cd agnosticd

ansible-navigator run ansible/main.yml \
--eei quay.io/agnosticd/ee-multicloud:latest \
--eev ~/secrets:/secrets \
-e @ansible/configs/test-empty-config/sample_vars_ec2.yml \
-e @/secrets/dev.yml
Some of the arguments in the above example can be setup in a config file, in your home directory.
~/.ansible-navigator.yamlansible-navigator:
execution-environment:
image: quay.io/agnosticd/ee-multicloud:latest
volume-mounts:
- src: /home/fridim/vars
dest: /vars
- src: /home/fridim/secrets
dest: /secrets
- src: /tmp
dest: /tmp
mode: stdoutThen the command is much simpler:
ansible-navigator run ansible/main.yml \
-e @ansible/configs/test-empty-config/sample_vars_ec2.yml \
-e @/secrets/dev.yml
Please refer to upstream documentation for configuring ansible-navigator.
Build
To build a new version of ee-multicloud, you can simply open a PR to update its file:
-
Containerfile
-
requirements.txt (python modules)
-
requirements.yml (ansible collections)
-
…
A GitHub workflow will automatically create the image and push it to Quay using a tag temporary-pr-1234 with 1234 being the id of the Pull Request.
Alternatively, you can build from your local machine:
cd ee-multicloud-public
podman build . -t ee-multicloud:mytag
Build supported images (reference only)
Requirements:
-
podman installed and configured
-
oc loginto the OCP4 cluster hosting the registry
mkdir -p ~/virtualenvs/ansible-builder
python3 -mvenv ~/virtualenvs/ansible-builder
. ~/virtualenvs/ansible-builder/bin/activate
pip install --upgrade pip
pip install -r requirements-ee.txt
podman login quay.io
podman login registry.redhat.io
podman login -u unused -p $(oc whoami -t) image-registry.apps.open.redhat.com
Execution environment images should always target specific dated versions.
ansible-builder build --tag ee-ansible2.9-python3.6-2021-10-29
-
PROD image-registry.apps.open.redhat.com
# prod
podman login -u unused -p $(oc whoami -t) image-registry.apps.open.redhat.com
registry=image-registry.apps.open.redhat.com

#replace with the image tag you want to push
name=ee-ansible2.9-python3.6-2021-10-29
podman push $name $registry/agnosticd/$name

name=ee-multicloud:v0.1.1
podman push $name $registry/agnosticd/$name
2.3. Workstation setup for OpenStack
Please see the OpenStack tutorial.
2.4. Workstation setup for AWS
2.4.1. Prerequisites
This is a configuration guide of the packages and repos you need to install the tools, but a previoulsy existing AWS account is needed.
2.4.2. Steps
-
Python Boto version 2.41 or greater
-
Git any version would do.
-
Ansible version 2.1.2 or greater
-
awscli bundle tested with version 1.11.32 Python and the Python dependencies may be installed via your OS' package manager (eg: python2-boto on Fedora/CentOS/RHEL) or via pip. Python virtualenv can also work.
|
Note
|
on Fedora, all dependencies are packaged and can be easily installed via
dnf install wget git awscli python3-boto3 ansible ansible-lint yamllint
(botocore and python will be pulled automatically through dependencies).
The lint tools are optional but are recommended tools to check the quality of your code.
|
# Install basic packages
yum install -y  wget python python-boto unzip python2-boto3.noarch tmux git ansible

# Another option to configure python boto is:
git clone git://github.com/boto/boto.git
cd boto
python setup.py install

#Install boto3
pip install boto3

#Install pywinrm if you plan to deploy windows VMs
#pip install pywinrm

# Enable epel repositories for Ansible
cd /tmp
wget https://dl.fedoraproject.org/pub/epel/epel-release-latest-7.noarch.rpm
sudo yum -y install `ls *epel*.rpm`

# Install ansible and checked install version (required 2.2.0.0)
yum install -y ansible
ansible --version


## Install aws cli
curl "https://s3.amazonaws.com/aws-cli/awscli-bundle.zip" -o "awscli-bundle.zip"
unzip awscli-bundle.zip
sudo ./awscli-bundle/install -i /usr/local/aws -b /bin/aws
aws --version# Install Python3
brew install python
# For python2 do
brew install python@2
# Depending on whether you did python3 or python2, use the pip3 or pip command
pip3 install boto3
#Install pywinrm if you plan to deploy windows VMs
#pip3 install pywinrm
# Install Ansible
pip3 install ansible
# Install awscli
brew install awscli2.4.3. Configure the EC2 Credentials
In order to be able to deploy AgnosticD configs on AWS, you will need an IAM user into your AWS account. If you are new to AWS, you can find the instructions.
-
You will need to place your EC2 credentials in the ~/.aws/credentials file:
mkdir ~/.aws
cat << EOF >>  ~/.aws/credentials
[default]
aws_access_key_id = CHANGE_ME
aws_secret_access_key = CHANGE_ME

EOF-
Add the SSH Key to the SSH Agent (optional) If your operating system has an SSH agent and you are not using your default configured SSH key, you will need to add the private key you use with your EC2 instances to your SSH agent:
ssh-add <path to key file>
|
Note
|
If you use an SSH config that specifies what keys to use for what hosts this step may not be necessary. |
2.4.4. AWS Permissions and Policies
AWS credentials for the account above must be used with the AWS command line tool (detailed below)
-
An AWS IAM account with the following permissions:
-
Policies can be defined for Users, Groups or Roles
-
Navigate to: AWS Dashboard → Identity & Access Management → Select Users or Groups or Roles → Permissions → Inline Policies → Create Policy → Custom Policy
-
Policy Name: openshift (your preference)
-
Policy Document:
{
    "Version": "2012-10-17",
    "Statement": [
        {
            "Sid": "Stmt1459269951000",
            "Effect": "Allow",
            "Action": [
                "cloudformation:*",
                "iam:*",
                "route53:*",
                "elasticloadbalancing:*",
                "ec2:*",
                "cloudwatch:*",
                "autoscaling:*",
                "s3:*"
            ],
            "Resource": [
                "*"
            ]
        }
    ]
}
-
|
Note
|
Finer-grained permissions are possible, and pull requests are welcome. |
2.4.5. AWS existing resources
-
A route53 public hosted zone is required for the scripts to create the various DNS entries for the resources it creates. Two DNS entries will be created for workshops:
-
master.guid.domain.tld- a DNS entry pointing to the master -
*.cloudapps.guid.domain.tld- a wildcard DNS entry pointing to the router/infrastructure node
-
-
An EC2 SSH keypair should be created in advance and you should save the key file to your system. To do so, follow these steps:
REGION=us-west-1
KEYNAME=ocpworkshop
$ openssl genrsa -out ~/.ssh/${KEYNAME}.pem 2048
$ openssl rsa -in ~/.ssh/${KEYNAME}.pem -pubout > ~/.ssh/${KEYNAME}.pub
$ chmod 400 ~/.ssh/${KEYNAME}.pub
$ chmod 400 ~/.ssh/${KEYNAME}.pem
$ touch ~/.ssh/config
$ chmod 600 ~/.ssh/config
Now, test connecting to your AWS account with your previously created credentials and your key:
+
---
$ aws ec2 import-key-pair --key-name ${KEYNAME} --region=$REGION --output=text --public-key-material "`cat ~/.ssh/${KEYNAME}.pub | grep -v PUBLIC`"
----
+ CAUTION: Key pairs are created per region, you will need to specify a different keypair for each region or duplicate the keypair into every region.
+
REGIONS="ap-southeast-1 ap-southeast-2 OTHER_REGIONS..."
$ for REGION in `echo ${REGIONS}` ;
  do
    aws ec2 import-key-pair --key-name ${KEYNAME} --region=$REGION --output=text --public-key-material "`cat ~/.ssh/${KEYNAME}.pub | grep -v PUBLIC`"
  done
2.5. Workstation setup for Azure
2.5.1. Prerequisites
This is a configuration guide of the packages and repos you need to install the tools, but a previoulsy existing Azure account is needed.
2.5.2. Steps
If you want to deploy on azure you will need the Azure client.
# Install the azure-cli system-wide
sudo -i
rpm --import https://packages.microsoft.com/keys/microsoft.asc
cat >> /etc/yum.repos.d/azure-cli.repo <<EOF
[azure-cli]
name=Azure CLI
baseurl=https://packages.microsoft.com/yumrepos/azure-cli
enabled=1
gpgcheck=1
gpgkey=https://packages.microsoft.com/keys/microsoft.asc
EOF

yum check-update
yum install -y azure-cli
We recommend you install the ansible module in a virtualenv.
# /!\ careful this will update ansible as well
# Use a virtualenv for those:
pip install --upgrade pip
pip install --upgrade --force ansible[azure]
|
Note
|
--force is used here, because of a known issue.
|
2.5.3. Service principal
It’s better to use a service principal instead of your main credentials. Refer to the official documentation.
az login
az ad sp create-for-rbac
az login --service-principal -u <user> -p <password-or-cert> --tenant <tenant>
azure_service_principal: "service principal client id"
azure_password: "service principal password or cert"
azure_tenant: "tenant ID"
azure_region: "Azure location, ex: EuropeWest"
azure_subscription_id: "Subscription id"
2.5.4. Virtualenv
If you want to use virtualenv, you can try & adapt this:
cd ansible
mkdir ~/virtualenv-aad
virtualenv ~/virtualenv-aad -p python2.7
. ~/virtualenv-aad/bin/activate
export CC=gcc-5
pip install -r requirements.txt
3. AgnosticD & Configs
This document gives an overview of the process of writing either a new config from scratch or copying and modifying an existing config. Well designed configs, can easily and cleanly be abstracted to allow deployment to multiple different Public and Private Clouds including AWS, Azure.
3.1. What are configs?
A config is simply a lab, workshop, or other deployment that has been defined and encapsulated in a series of playbooks, variable files, and templates in a config directory. This allows Ansible Agnostic Deployer to deploy it simply and repeatedly on one or more Cloud Platforms.
3.2. How you Deploy configs
configs are typically deployed via one of 3 methods:
-
From the command line. A suitably configured Ansible Control Node, or laptop, can invoke a new config deployment by invoking
ansible-playbook main.yml -e @./configs/<CONFIG_NAME?sample_vars.ymlor other variable file with the appropriate parameters. See Three Tier App for an example. -
Via a front-end application such as Red Hat Cloud Forms or ServiceNow which provides a user friendly catalog or "portal" type interface to the end user and can invoke the appropriate ansible command directly or via a "wrapper" script.
-
It is also possible to invoke a config by creating AgnosticD as an Ansible Tower Project and defining configs as jobs. Going forward this pattern will influence the future evolution of AgnosticD. Once a config is defined as a job it can either be directly invoked or via a front-end application or script making an API call to an Ansible Tower server.
3.3. How AgnosticD Deploys configs
AgnosticD deploys configs via a 6 stage process, discussed in more detail below. This provides config creators considerable flexibility, without undue complexity, to control the deployment process in a modular manner and enables you to abstract the Cloud Specific steps (e.g. AWS ec2 or Microsoft Azure) from the application or OS specific steps. Greatly enhancing Cloud Portability.
The last point is key, as it allows developers to simply add new Cloud Platforms at a latter date, or provide their configs with multi-cloud support from day 1. The term Cloud Provider includes the ability to add a virtualization platform (e.g. KVM, Hyper-V), Public Cloud Platform (e.g. Google Cloud Engine), or a container based platform such as OpenShift or Docker.
Currently supported platforms (via Cloud Providers):
-
ec2
-
azure
-
osp
-
gcp
-
ibm
-
equinix_metal
-
none
-
test
4. Overview of a Typical Config
Configs are located in the ansible/configs/ directory:
README.adoc              linklight                 ocp-ha-disconnected-lab   quay-enterprise
ans-tower-lab            linklight-demo            ocp-ha-lab                rhte-ansible-net
ansible-cicd-lab         linklight-engine          ocp-implementation-lab    rhte-lb
ansible-provisioner      linklight-foundations     ocp-multi-cloud-example   rhte-oc-cluster-vms
archive                  linklight-networking      ocp-storage-cns           rhte-ocp-workshop
bu-workshop              linklight-networking-all  ocp-workloads             simple-multi-cloud
just-a-bunch-of-nodes  ocp-clientvm              ocp-workshop              three-tier-app
lightbulb                ocp-gpu-single-node       openshift-demos
Above configs subject to change over time
A typical Config is well illustrated by Three Tier App.
three-tier-app
├── README.adoc           # Config specific README
├── destroy_env.yml       # Teardown playbook to remove the config when finished
├── env_vars.yml          # Default vars containing configuration variables
├── files                 # Sub-directory for templates, cloud provider files etc
├── pre_infra.yml         # Stage 0 Playbook
├── post_infra.yml        # Stage 2 Playbook
├── pre_software.yml      # Stage 3 Playbook
├── software.yml          # Stage 4 Playbook
├── post_software.yml     # Stage 5 Playbook
├── sample_vars.yml       # Sample user supplied vars (cloud provider, ids etc)
└── topology.png          # Optional topology diagram
4.1. sample_vars.yml
Sample user supplied vars.
4.2. default_vars.yml
Default vars containing configuration variables.
4.3. secret.yml
secret.yml normally lives in your home direcotry - anywhere outside of the
AgnosticD repository itself. They should never be committed to Git!
Example secret files include;
osp_auth_username: alice
osp_auth_password: toomanysecrets
...
You can see that these are sensitive credentials.
When running AgnosticD, it’s normal to "pass in" your secrets like this;
user@host: ansible-playbook main.yml -e@~/secret.yml -e@configs/...
5. AgnosticD Flow
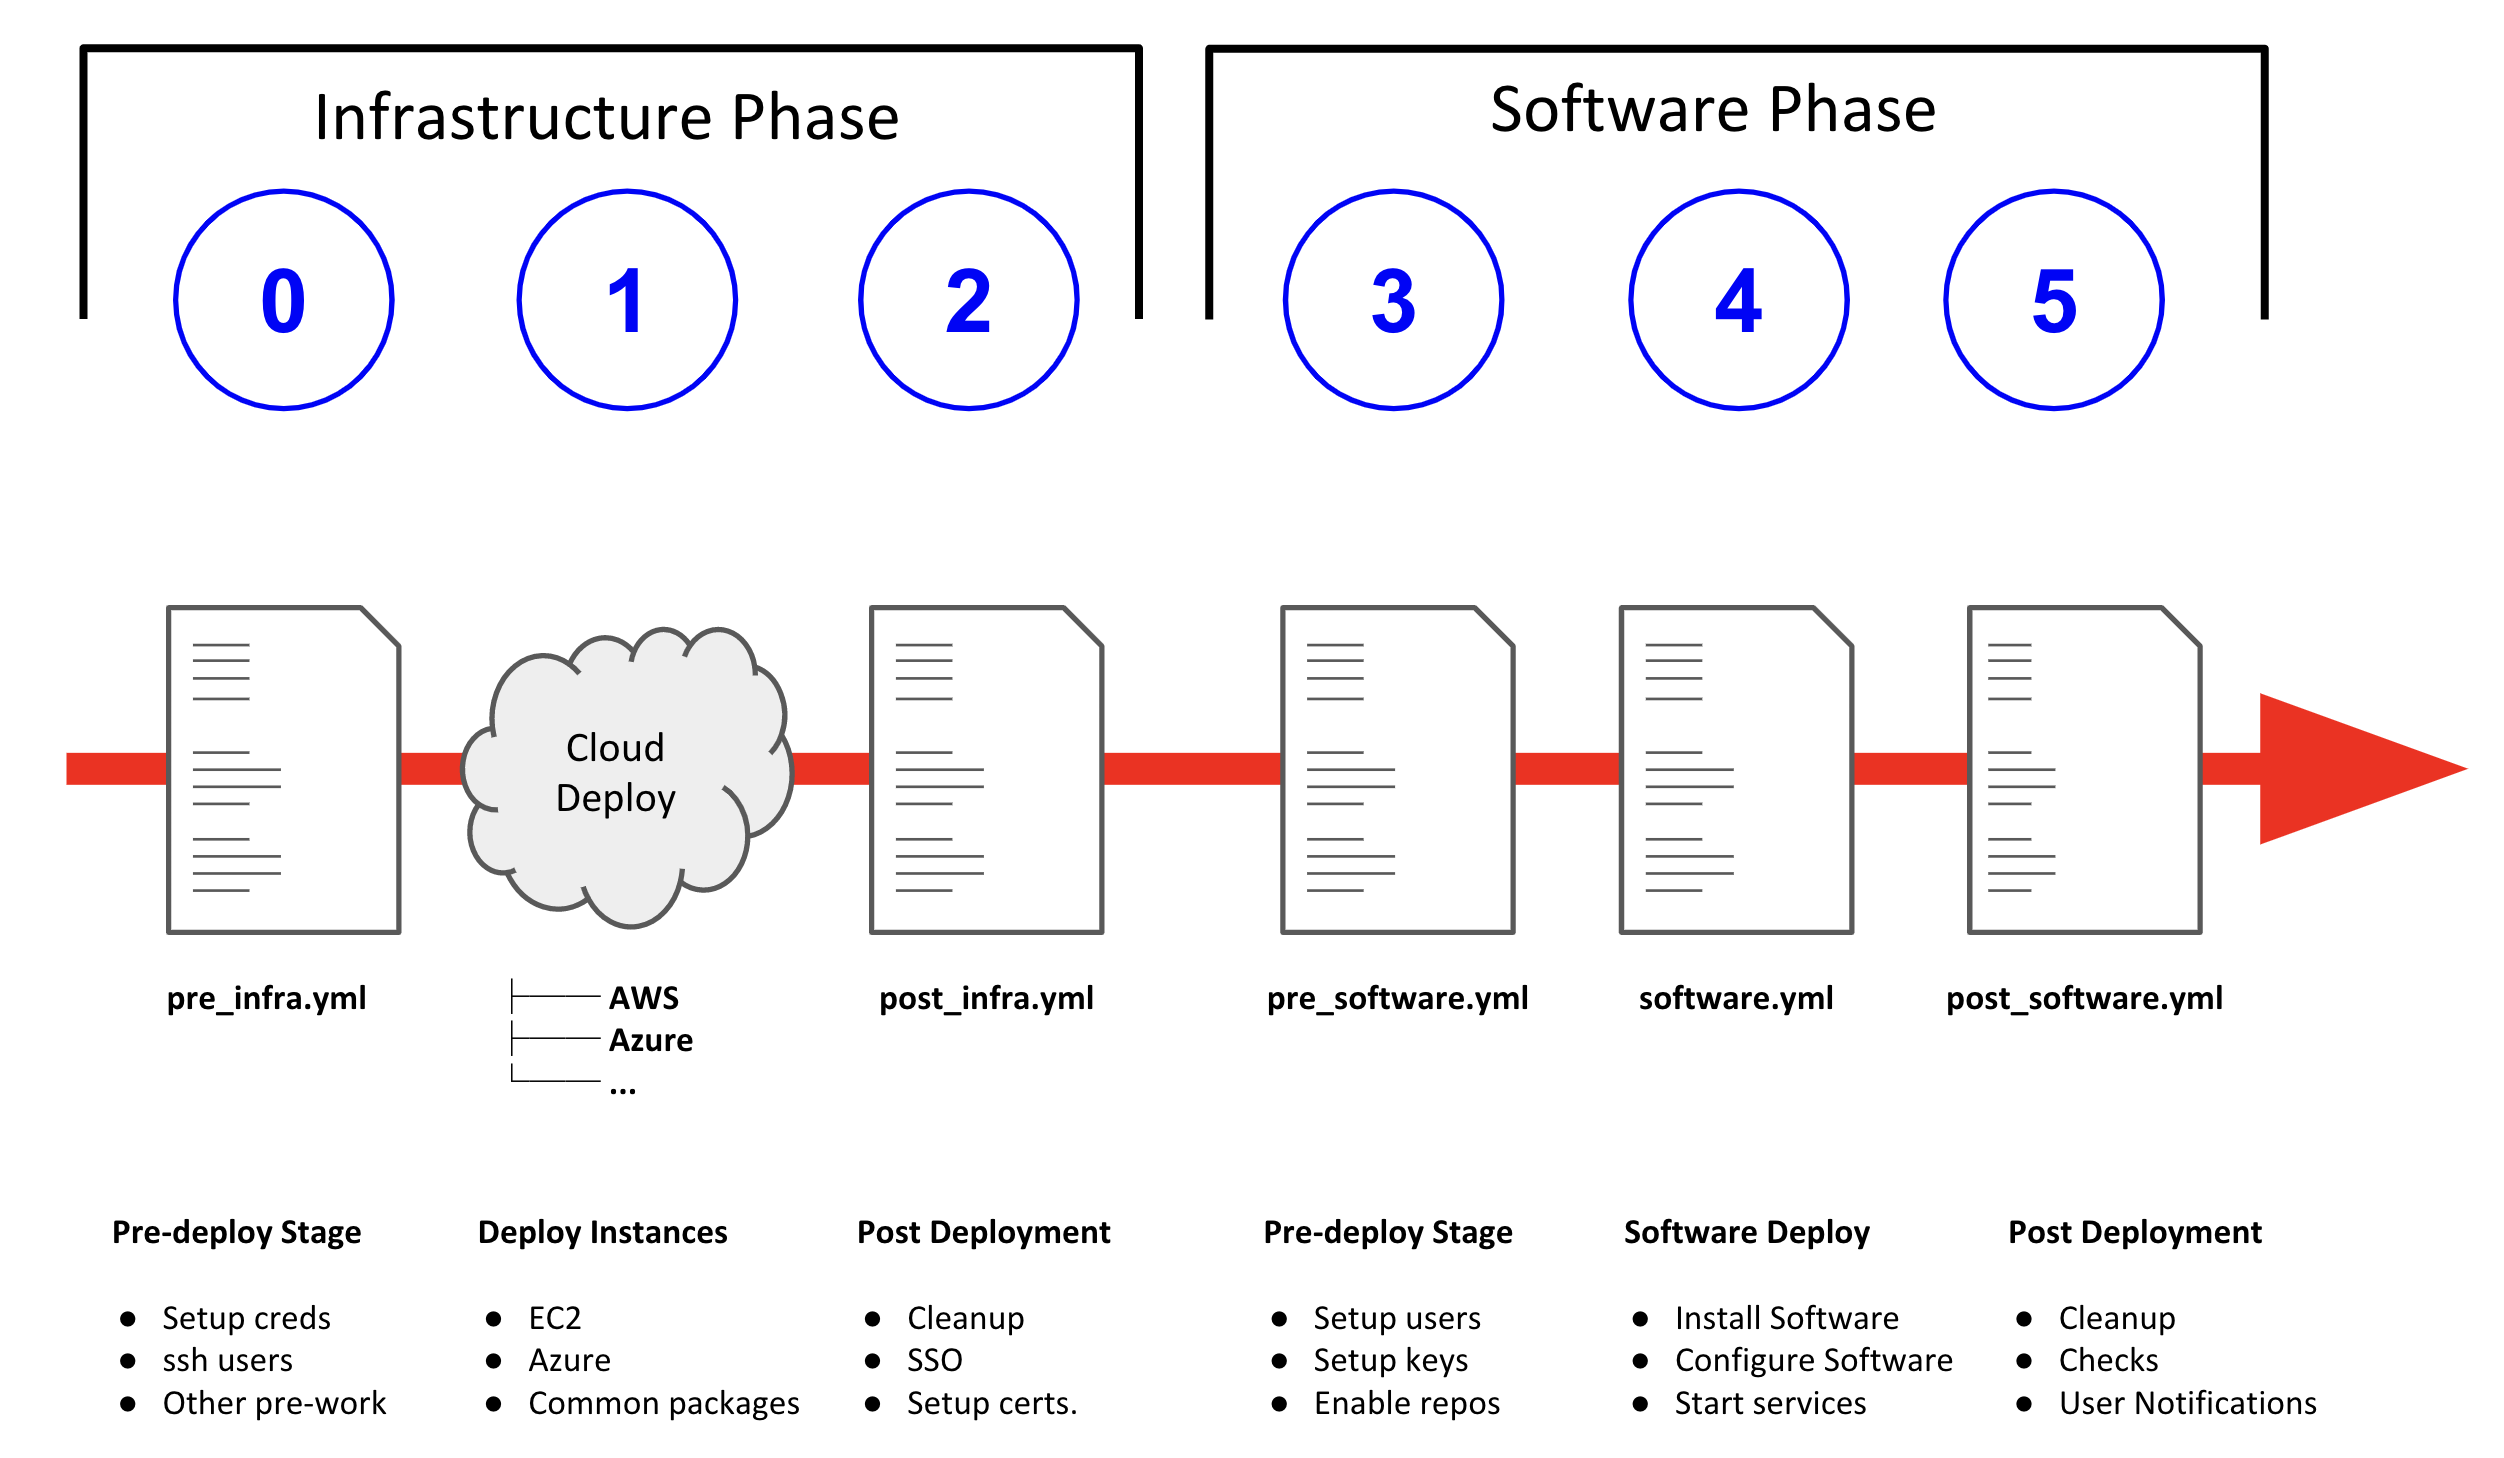
When ansible starts to deploy a config the process involves 2 logically distinct phases, Infrastructure and Software, each broken up into 3 Steps. This is illustrated below:
AAD deployments start by invoking a common main.yml with an environmental
variable file identifying the cloud platform to deploy plus other meta-data.
e.g. ansible-playbook main.yml -e @configs/three-tier-app/sample_vars.yml
main.yml- import_playbook: "configs/{{ env_type }}/pre_infra.yml"
- import_playbook: "cloud_providers/{{ cloud_provider }}_infrastructure_deployment.yml"
- import_playbook: "configs/{{ env_type }}/post_infra.yml"
- import_playbook: "configs/{{ env_type }}/pre_software.yml"
- import_playbook: "configs/{{ env_type }}/software.yml"
- import_playbook: "configs/{{ env_type }}/post_software.yml"For config developers the above stages provide 5 hooks for customizing the configuration of your environment and 1 hook for customizing it for one or more cloud providers (e.g. AWS, Azure, etc).
An example config is provided by ansible/configs/just-a-bunch-of-nodes
5.1. Stage 0 pre_infra.yml
In this stage AAD is the entry playbook and is typical used for setting up any infrastructure etc prior to launching a cloud deployment. Typical tasks could include:
-
Creating necessary ssh keys
-
Moving any ssh keys into place, setting permissions etc
-
Creating any payloads to be used in later stages e.g. repo files etc
-
Ensuring cloud credentials are available
|
Note
|
Please refer to SSH keys and access for anything around that topic. |
5.2. Stage 1 Cloud Provider Deploy
This stage is unique in the flow in that the config creator doesn’t supply a playbook but typically has to provide cloud specific configuration data.
Clouds are selected via the value of the cloud_provider variable and supported
clouds can be found in ansible/cloud_providers. Currently supported are:
-
Amazon Web Services (AWS)
-
Microsoft Azure
Example: AWS configs use CloudFormations templates to deploy their
infrastructure so this can be provided. Take a look at Three Tier Apps
Cloud Formation Template.
Notice it is written in Jinja2 and can easily be extended to deploy more, or
less servers, plus you can change the Operating Systems, software payloads
etc. This is done by overriding the default variables found in
env_vars.yml.
|
Note
|
A Cloud Creators document exists to facilitate adding further clouds to AAD. Wish list items include:
|
5.3. Stage 2 post_infra.yml
In this stage AgnosticD can execute any "post infrastructure" tasks. It is not uncommon for this phase to do nothing but it provides a convenient hook for any tasks that may need to be run after building your Cloud Infrastructure. For example running any smoke tests that may be required.
5.4. Stage 3 pre_software.yml
At this point the infrastructure should be up and running but typically in a un-configured state. This stage provides a convenient hook for running any tasks that may be needed before software payload deployment. For example"
-
Running any pre software tests
-
Setup software dependant yum repos or equivalent
-
Retrieving any licenses etc.
-
sshkey housekeeping - for example inserting additional keys and configuration -
Prepare
bastionhosts orjumpboxes
5.5. Stage 4 software.yml
In this stage AgnosticD deploys any software payloads onto the infrastructure. This could be as simple as installing Apache or as complex as installing and configuring an N-tier application.
5.6. Stage 5 post_software.yml
In the final stage AgnosticD would typically perform a number of tasks including:
-
Any cleanup from the prior stages
-
Any end to end or component testing
-
User notification of the running configuration
SSH keys and access
This section describes how SSH keys are managed in agnosticd.
6. Scope
Here is the list of agnosticd cloud providers that follow this workflow:
-
ec2
-
azure
Long-term, we want all cloud providers to comply.
7. Workflow
-
PRE-INFRA cloud-agnostic role
create_ssh_provision_keygenerates a per-environment, for infra, local SSH key-
output file: private and public key in
output_dir -
output facts:
-
ssh_provision_key_nameex:ssh_provision_{{ guid }} -
ssh_provision_key_pathex:/tmp/output_dir/ssh_provision_{{ guid }} -
ssh_provision_pubkey_pathex:/tmp/output_dir/ssh_provision_{{ guid }}.pub -
ssh_provision_pubkey_content
-
-
Role is idempotent and can be used to only set the facts
-
-
INFRA role
infra-{{ cloud_provider }}-ssh-keyto create the keypair in the cloud provider -
INFRA in the cloud providers, use the key previously created to provision the infra
-
POST-INFRA generate ssh configuration using the variable
ssh_provision_key_path, done by the role infra-common-ssh-config-generate -
POST-INFRA cloud-agnosticd post-infra role to update the authorized_keys on all hosts
-
Input var:
ssh_authorized_keys: list of content pub keys and key options. That’s where we set the content of the public keys for additional access (admins, backdoor key, …).examplessh_authorized_keys(preferred)ssh_authorized_keys: - key: ssh-rsa ... - key: ssh-rsa ... key_options: no-port-forwarding,from="10.0.0.1" - key: https://github.com/fridim.keys-
all_ssh_authorized_keyslist is also supported (backward-compatible)exampleall_ssh_authorized_keys(legacy only)all_ssh_authorized_keys: - ssh-rsa ... - ssh-rsa ... - https://github.com/fridim.keys
-
-
-
DESTROY role
infra-{{ cloud_provider }}-ssh-keyto delete the keypair in the cloud provider
7.1. Lifecycle and destroy
The private key and SSH config are stored in output_dir.
In order to access the instances after provision you need access to output_dir.
If you’re developping from your laptop, that should be transparent since output_dir will be persistent across calls of ansible-playbook.
On the other hand, when you’re provisioning from Tower or Controller (or from RHPDS), you need output_dir to be persistent across jobs and that is done by the 2 following roles:
-
agnosticd_save_output_dirSaveoutput_dirand push it to S3 -
agnosticd_restore_output_dirRestoreoutput_dirfrom S3
Make sure the secrets and variables are set so those roles are executed:
# PROD bucket
# Archive object to create in S3 storage.
agnosticd_save_output_dir_archive: "{{ guid }}_{{ uuid }}.tar.gz"
# If you want to protect the archive with a password:
# it can be useful if the S3 bucket is shared between multiple users.
# agnosticd_save_output_dir_archive_password: ...

# S3 storage bucket access information, should be provided by a secret.
agnosticd_save_output_dir_s3_bucket: agnosticd-output-dir
agnosticd_save_output_dir_s3_region: us-east-1
agnosticd_save_output_dir_s3_access_key_id: "..."
agnosticd_save_output_dir_s3_secret_access_key: "..."
8. Bring your own provision key (optional)
|
Note
|
Most of the time you don’t need to bring your own key as it is generated automatically. |
In some cases the SSH key generation described above is not working well (e.g., the key pair can be lost if not stored at persistent storage and destroy job will fail). It is possible to specify an existing SSH key which will be used for the environment provisioning and destroy by setting the following variables:
-
ssh_provision_key_path -
ssh_provision_key_name -
ssh_provision_pubkey_content(optional)example settingssh_provision_*variablesssh_provision_key_name: "my_private_ssh_key.pem" ssh_provision_key_path: "/home/account/.ssh/{{ ssh_provision_key_name }}" ssh_provision_pubkey_content: ssh-rsa AAAAB3NzaC1 ...rest of the key... JjQ==
9. Roles
-
Generate locally a private SSH key in
output_dirand set the facts for later use. The resulting public key is used to provision the instances. The role is idempotent and can be run multiple times. -
infra-{{ cloud_provider }}-ssh-keyCreate the key resource in the cloud provider so it can be attached to instances. For example
infra-ec2-ssh-key. -
infra-common-ssh-config-generateGenerate the SSH configuration in
output_dir -
Populate
authorized_keysfiles on the instances for additional access. -
Compatibility role to facilitate migration from deprecated roles. See readme.
9.1. Deprecated roles and variables
Roles:
DEPRECATED |
Use instead |
|
|
|
|
Variables:
DEPRECATED |
Use instead |
|
|
|
|
10. Config Writing Tutorials

10.1. Config on OpenShift (Workloads)
An OpenShift Workload is simply a workload that is applied to an existing, running, OpenShift cluster. For example if you wish to deploy 3Scale, Prometheus, or a MicroService application you can define it as a Workload then simply and consistently deploy it with a single command to your OpenShift cluster.
This document assumes more than a passing familiarity with OpenShift but if you just want to "copy and hack" an existing Workload take a look at the OpenShift 3Scale workload.
Other OpenShift Workloads here. OpenShift Workloads all begin
ocp-workload- and follow the traditional structure of an Ansible Role.
10.1.1. Creating Workloads that install OpenShift operators
When creating a workload that installs an operator into a cluster you need to be aware of the fact that operators change quite frequently. To prevent your workload from breaking when a new release of the operator is released into the online catalog it is highly recommended to create an operator catalog snapshot.
10.1.2. How are Workloads Deployed?
OpenShift Workloads are deployed by applying an Ansible role to an existing, running, cluster.
New and existing workloads can be deployed, and developed, on any OpenShift
cluster including locally on your laptop (oc cluster and Minishift).
Each Workload Role includes a detailed README.adoc and they are applied by
invoking the ocp-workload config.which is actually a Playbook and will apply
the workload in the value ocp_workload. For example:
ansible-playbook -i localhost, -c local ./configs/ocp-workloads/ocp-workload.yml \
                    -e ocp_workload=ocp-workload-3scale-multitenant \
                    -e ACTION=create \
                    -e subdomain_base=$SUBDOMAIN_BASE \
-e admin_username=$ADM_USERNAME|
Note
|
This information is deprecated. The catalog item in RHPDS no longer exists. |
10.2. Config on OpenStack
In this document we will explain how one could setup their laptop for AgnosticD deployment with OpenStack.
If you are a Red Hatter, you can use rhpds.redhat.com to request access to our OpenStack cluster:
-
Log in to https://rhpds.redhat.com/ using your opentlc user.
-
Go to Services → Catalogs → Novello Testing → OSP Sandbox AgD Training (all Red Hat employees should see it, make sure you are in the right group).
-
Click Order → Submit
|
Note
|
You will receive three emails indicating the status of the environment and instructions for accessing the environment. In the third email you receive all information you need to login to the client machine that would have the rest of required information. |
|
Note
|
You can use the bastion VM as your ansible host or copy the files over to your laptop and work locally. Most steps are only necessary on your laptop as the bastion host is already pre-configured. |
10.2.1. Configure your environment for running OpenStack Ansible
|
Note
|
on Fedora dnf install python3-openstacksdk python3-openstackclient python-openstackclient-doc python-openstackclient-lang python3-heatclient python-heatclient-doc python3-dns will do the job (you may choose to skip doc and lang packages).
|
-
Please make sure the file
/etc/ansible/hostsdoesn’t exist or is empty, otherwise this default inventory file will cause problems later. -
Install Python 3, gcc, and python package managemend and development libraries (On your laptop or on the clientVM):
# on Linux $ sudo yum install gcc python3 python3-devel python3-libs python3-pip -y # on Mac $ brew install python pyenv-virtualenv -
Create virtualenv environment and download python requirements:
-
Create virtualenv and activate
$ python3 -m venv ansible2.9-python3.6 ##In Mac $ pyenv virtualenv ansible2.9-python3.6 ## In Mac, if you find the error " the error: error: pyenv: pip: command not found]", it could because you need pip3, in that case please do: $ alias pip=pip3 $ pip install --upgrade pip $ source ansible2.9-python3.6/bin/activate ## In Mac $ source /Users/[USER]/.pyenv/versions/ansible2.9-python3.6/bin/activate ## ^replace [USER] with your username or the proper path -
Install the python modules inside that virtualenv
-
On Mac
$ pip3 install -r https://raw.githubusercontent.com/redhat-cop/agnosticd/development/ansible/configs/ocp4-disconnected-osp-lab/files/macos_requirements.txt -
On Linux
(ansible2.9-python3.6) $ pip3 install -r https://raw.githubusercontent.com/redhat-cop/agnosticd/development/tools/virtualenvs/ansible2.9-python3.6-<DATE>.txt #(1)-
go to https://github.com/redhat-cop/agnosticd/tree/development/tools/virtualenvs and check the latest available version (symlinks don’t work).
-
-
-
10.2.2. Getting your OpenStack Credentials
-
Create the
~/.config/openstack/clouds.yamlfile on your laptop using the information provided in the final email.$ mkdir -p ~/.config/openstack $ vim ~/.config/openstack/clouds.yaml -
Review your
~/.config/openstack/clouds.yaml:cat ~/.config/openstack/clouds.yaml clouds: 35eb-project: auth: auth_url: "http://169.47.17.15:5000/v3" username: "35eb-user" project_name: "35eb-project" project_id: "1a79cf800ff94754bb495e2c1fd9d433" user_domain_name: "Default" password: "YOUR_TEMP_PASSWORD" region_name: "regionOne" interface: "public" identity_api_version: 3 -
Check that your credentials are working. In order to do so, first log into your bastion, using the credentials provided to you via email:
sassenach:~ Cibeles$ ssh YOUR-OPENTLC-USER@bastion.GUID.red.osp.opentlc.com
YOUR-OPENTLC-USER@bastion.GUID.red.osp.opentlc.com's password: YOUR_EMAIL_PROVIDED_PASSWORD
$ openstack --os-cloud=GUID-project server list +--------------------------------------+-----------+--------+------------------------------------------------+-------+---------+ | ID | Name | Status | Networks | Image | Flavor | +--------------------------------------+-----------+--------+------------------------------------------------+-------+---------+ | 653fb842-6ce8-4eb0-a51a-dc0f3d5fb103 | bastion | ACTIVE | 35eb-ocp-network=192.168.47.33, 169.47.183.214 | | 2c2g30d | +--------------------------------------+-----------+--------+------------------------------------------------+-------+---------+ -
Try to login to OpenStack UI using the auth_url from the
clouds.yamlwithout port and path, i.e. something like: https://api.xxx.infra.opentlc.com/. You must use username and password from.config/openstack/clouds.yamlto login to the UI (the domain can be ignored as long as it is 'Default').
10.2.3. Setting up AgnosticD and your development environment
-
Clone the AgnosticD repository:
git clone https://github.com/redhat-cop/agnosticd -
Create your
secret.ymlfile outside the repository, and edit it using the correct credentials based on yourclouds.ymlfile:cat << EOF >> ~/secret.yml # Authenication for OpenStack in order to create the things # RED osp_auth_username: CHANGEME osp_auth_password: CHANGEME osp_project_name: CHANGEME osp_project_id: CHANGEME osp_auth_url: http://169.47.188.15:5000/v3 osp_auth_project_domain: default osp_auth_user_domain: default # DNS osp_cluster_dns_server: "169.45.246.132" # ddns01.opentlc.com (1) osp_cluster_dns_zone: students.osp.opentlc.com ddns_key_name: PROVIDED_BY_ADMIN # default value is set to "hmac-dm5" ddns_key_secret: PROVIDED_BY_ADMIN # Repo own_repo_path: PROVIDED_BY_ADMIN # Do not create PROJECT, we already have one and want to use it osp_project_create: false EOF
|
Note
|
You can find a secret.yml file provided to you on the home directory of your user at your bastion machine, use this to populate the file as previously stated. |
|
Important
|
until issue #3275 is fixed, make sure that you replace the DNS name with an IP address if you have a dnspython library with version 2.x (e.g. on Fedora 33+). |
[YOUR_USER@bastion ~]$ ls
agnosticd secrets.yaml|
Note
|
It is required that OpenStack SDK is installed on your working machine. For further information, please refer to its web page |
-
First checkpoint, make sure this secret file is correct by running the test-empty-config.
cd agnosticd/ansible ansible-playbook main.yml \ -e @configs/test-empty-config/sample_vars_osp.yml \ -e @~/secret.yml -
Copy the
sample_vars_osp.ymlfile and call itmy_vars.ymlcp configs/just-a-bunch-of-nodes/sample_vars_osp.yml \ configs/just-a-bunch-of-nodes/my_vars.yml -
Edit the
my_vars.ymland change theguidvalue to something short and unique.WarningDo not pick the same GUID as the one you got for access to the OSP cluster. -
you also need to check the
emailand theown_repo_pathvariables (or overwrite them in your secrets file). -
Second checkpoint, Run the ansible-playbook command to deploy just-a-bunch-of-nodes
ansible-playbook main.yml \ -e @configs/just-a-bunch-of-nodes/my_vars.yml \ -e @~/secret.ymlNoteIf you are having python2 Vs. Python3 issues, Add /usr/bin/python3.6before the ansible-playbook command. For example:/usr/bin/python3.6 ansible-playbook ansible/main.yml -e @configs/just-a-bunch-of-nodes/my_vars.yml -e@~/secret.yml -
Check that the VM was installed and ssh into the box using the created key. In order to do so, first log into your bastion, using the credentials provided to you via email:
sassenach:~ Cibeles$ ssh YOUR-OPENTLC-USER@bastion.GUID.red.osp.opentlc.com
YOUR-OPENTLC-USER@bastion.GUID.red.osp.opentlc.com's password: YOUR_EMAIL_PROVIDED_PASSWORD
[YOUR_USER@bastion ~]$ openstack --os-cloud=${GUID}-project server list +--------------------------------------+---------+--------+---------------------------------------------------------+-------+---------+ | ID | Name | Status | Networks | Image | Flavor | +--------------------------------------+---------+--------+---------------------------------------------------------+-------+---------+ | 2715f0d9-51e1-4619-a97e-c841914dddf6 | node | ACTIVE | testamaya-default-network=192.168.47.26 | | 2c2g30d | | 6931bf5a-ec1e-4ac7-8477-9e96f9e14de3 | bastion | ACTIVE | testamaya-default-network=192.168.47.17, 169.47.188.156 | | 2c2g30d | | 947d6397-c152-4a38-9825-02f9fa50c03e | bastion | ACTIVE | 98e1-testnet-network=192.168.0.35, 169.47.191.80 | | 2c2g30d | +--------------------------------------+---------+--------+---------------------------------------------------------+-------+---------+
You can see there are some machines there and their IP addresses. Now you can log into your bastion machine from the outside world (your laptop) or from the bastion machine you were given credentials for in the email.
Let’s log in from the outside world (your laptop) using your ${GUID}_infra_ssh_key.pem key file. Please note that the key file should be created in the machine you launched the playbook from.
sassenach:~ Cibeles$ ll /tmp/output_dir/
 8 -rw-r--r--   1 Cibeles  staff   235B May 26 17:41 basic_heat_template.yml
 8 -rw-r--r--   1 Cibeles  staff   369B May 28 16:38 hosts-just-a-bunch-of-nodes-testamaya
16 -rw-r--r--   1 Cibeles  staff   6.8K May 26 17:42 just-a-bunch-of-nodes.testamaya.osp_cloud_master_template.yaml
 8 -rw-r--r--   1 Cibeles  staff   1.1K May 28 16:32 just-a-bunch-of-nodes_testamaya_ssh_conf
 8 -rw-r--r--   1 Cibeles  wheel   175B May 28 16:33 just-a-bunch-of-nodes_testamaya_ssh_known_hosts
 8 -rwxr--r--   1 Cibeles  staff   168B May 28 16:37 ssh-config-just-a-bunch-of-nodes-testamaya*
 8 -rw-------   1 Cibeles  staff   1.6K May 25 13:16 testamaya_infra_ssh_key.pem
 8 -r--------   1 Cibeles  wheel   1.8K May 28 16:19 testamayakey
 8 -rw-r--r--   1 Cibeles  wheel   399B May 28 16:19 testamayakey.pub

sassenach:~ Cibeles$ ssh -i /tmp/output_dir/testamaya_infra_ssh_key.pem cloud-user@169.47.188.156
Last login: Thu May 28 10:49:27 2020 from 90.77.177.210
[cloud-user@bastion 0 ~]$-
Now, if you want to log into any of your nodes, you just simply need to copy the identity file into the newly deployed bastion machine and ssh from it (as nodes do not have an external IP).
sassenach:~ Cibeles$ scp -i /tmp/output_dir/testamaya_infra_ssh_key.pem /tmp/output_dir/testamaya_infra_ssh_key.pem cloud-user@169.47.188.156:. [cloud-user@bastion ~]$ ssh -i testamaya_infra_ssh_key.pem cloud-user@node Last login: Tue Jun 2 12:16:17 2020 from bastion.example.com -
You can now adapt
my_vars.ymlto your needs. Create different kind of instances, more security groups, etc.
10.2.4. Clean up
-
Destroy the deployment:
ansible-playbook destroy.yml \
  -e @configs/just-a-bunch-of-nodes/my_vars.yml \
  -e @~/secret.yml
|
Caution
|
beware that this last action destroys also the initial bastion so that you can’t reuse it for further tests in the same sandbox. It has been captured in issue #3726. |
10.2.5. What’s next ?
-
ocp-workloads: deploy an OpenShift app on a shared cluster. See
sample_varsdirectory. -
ocp4-cluster: deploy an OpenShift cluster. You can applied your workloads on top of it using the
ocp_workloadslist. See sample_vars_osp.yml.
11. AgnosticD Variables
Variables used by specific configs and roles should be documented along with the config and role. Variables that used by Ansible core or have a common meaning across many configs are documented here.
|
Note
|
At the time of this writing this list is known to be an incomplete. |
11.1. Core Required Variables
| Name | Description |
|---|---|
|
Cloud provider.
Required variable, but may be set to |
|
Config name which should match to a subdirectory under |
|
Unique ID used in labels, tags, metadata, and resource naming throughout the config to identify resources and prevent conflicts. |
|
Action to be performed by the lifecycle playbook or workload. |
11.2. Core Variables
| Name | Description |
|---|---|
|
Authentication Bearer token used to callback with information and data collected from |
|
API URL used to callback with information and data collected from |
11.3. Other Variables
| Name | Description |
|---|---|
|
Metadata used by the Babylon infrastructure when running AgnosticD. This variable should be ignored by workloads, configs, and roles. |
|
Metadata used by the OpenTLC and RHPDS admin host when running AgnosticD. This variable should be ignored by workloads, configs, and roles. |
12. AgnosticD User Info
Configs and Workloads in AgnosticD often need to save or return information during provisioning. Some examples include dynamically generated hostnames, IP addresses, and passwords. This information may be text messages to be delivered by email or structured data to be consumed by automation.
The agnosticd_user_info action plugin can be used to provide to save messages and data within your config playbook, workload, or anywhere you have an Ansible task.
This replaces the previous conventions of using debug with user.info: messages.
12.1. Environment Messages
To return a message to show to the lab provisioner, set msg. For example:
  - name: Report URL for web console
    agnosticd_user_info:
      msg: "OpenShift Web Console: {{ _openshift_console_url }}
To set messages on several lines then call agnosticd_user_info with loop.
Multiline messages cannot be passed as a text block with embedded linebreaks due to how these messages are processed by current automation.
  - name: Provide OpenShift Access Information
    agnosticd_user_info:
      msg: "{{ item }}"
    loop:
      - "OpenShift Web Console: {{ _openshift_console_url }}"
      - "OpenShift API for command line 'oc' client: {{ _openshift_api_url }}"
Blank lines may be included in your message output by sending an empty message string.
  - name: Provide OpenShift Access Information
    agnosticd_user_info:
      msg: "{{ item }}"
    loop:
      - "OpenShift Web Console: {{ _openshift_console_url }}"
      - "OpenShift API for command line 'oc' client: {{ _openshift_api_url }}"
      - ""
      - "You may download the 'oc' client from {{ ocp4_client_url }}"
User info messages are meant to be delivered by automation to users of the provisioned environments.
A body may be specified in the same way as msg to override a standard message.
Content for body should precede other messages if provided.
  - name: Provide user info message body
    agnosticd_user_info:
      body: "{{ item }}"
    loop:
      - "Your catalog item has been provisioned."
      - ""
      - "Important information about your environment:"
Messages sent this way will be saved to user-info.yaml in the output directory, set by output_dir.
12.2. Environment Data
To set data to be consumed by other automation, such as the Babylon Events UI/Bookbag, set data when calling agnosticd_user_info.
  - name: OpenShift Access Data
    agnosticd_user_info:
      data:
        openshift_console_url: "{{ _openshift_console_url }}"
        openshift_api_url: "{{ _openshift_api_url }}"
Data values are saved as a dictionary to provision-user-data.yaml in the output directory.
To use this data through bookbag Asciidoc deployed by the Babylon Events UI we recommend setting AsciiDoc macros:
:openshift_console_url: %openshift_console_url%
:openshift_api_url: %openshift_api_url%

OpenShift Web Console: {openshift_console_url}
OpenShift API: {openshift_api_url}
12.3. Multi-User Lab Environments
When provisioning a multi-user environment with AgnosticD you will want to deliver separate messages to each user. For example, a secure unique password for each user, a separate OpenShift namespace per user, etc.
User messages and data are set similarly to environment messages and data, but adding a user argument to agnosticd_user_info:
  - name: OpenShift Access Data
    agnosticd_user_info:
      user: "user-{{ n }}"
      msg: |-
       OpenShift Web Console: {{ _openshift_console_url }}
       OpenShift API: {{ openshift_api_url }}

       Login with user "user-{{ n }}" and password "{{ _openshift_user_password[n] }}"
      data:
        openshift_console_url: "{{ _openshift_console_url }}"
        openshift_api_url: "{{ _openshift_api_url }}"
        openshift_user_name: "user-{{ n }}"
        openshift_user_password: "{{ _openshift_user_password[n] }}"
        openshift_user_namespace: "user-{{ n }}"
    loop: "{{ range(user_count | int) | list }}"
    loop_control:
      loop_var: n
Messages set with msg may be multi-line when combined with user.
This makes it easier to loop over a range of users.
If msg is called repeatedly for the same user then messages will be joined with a newline character.
User data dictionary values are combined with any values previously set for the same user.
If the same key is set twice for a user then the previous value is replaced.
Environment data, set by calls to agnosticd_user_info without user will not be exposed to users.
All user data and messages is collected in ACTION-user-data.yaml with user data stored as a dictionary under the key "users".
13. Contributing
If you’re reading this, hopefully you are considering helping out with Ansible Agnostic Deployer aka AgnosticD.
These are our contribution guidelines for helping out with the project. Any suggestions, improvements, clarifications etc., please let us know via a GitHub issue.
13.1. General rules
-
The Ansible Code of Conduct still applies.
-
For git messages, branch names, etc., follow Git Style Guide.
-
Pull Requests should reference an issue whenever possible.
-
Pull Requests must contain a well crafted description.
-
In your Pull Request, specify
closes #NUMto automatically close the issue when the PR is merged.
-
-
To contribute, fork and make a pull request against the
developmentbranch. -
Use asciidoc for documentation.
-
Pull requests should only change:
-
One role
-
One config
-
If more than one, please explain why an exception should apply. Ask yourself, « Can this pull request be separated in several smaller pull requests ? »
-
-
Pull Request titles:
-
Must start with
Add | Change | Fix | Remove -
followed by
config | workload | role | core | test | documentation -
followed by the name of the config, workload, role, cloud provider, test or documentation
-
followed by a description that explains in sufficient details the why and what.
-
Leaving this empty or not putting any effort into the description will lead to the PR being sent back or closed.
-
-
-
Pull Request must be tested. Explain how you tested your change.
-
For example, you can state that you tested the changes against config X on cloud provider Y.
-
-
Owner of existing role or config must be set as reviewer.
-
If new role or config, owner must be identified.
-
-
If your Pull Request is not ready for review, open it as Draft or prefix with
WIPin the title. -
AgnosticD is part of the Red Hat Community of Practices; the Red Hat CoP Contribution Guidelines apply.
-
Do not push binary files or large files into Git. Instead, expose them, for example using public Object storage like S3, and fetch them with ansible using modules like
get_url. -
Destroy playbooks must be idem-potent. If run twice, they should not exit with an error.
13.2. Code Quality Rules
-
A YAML
.yamllintfile should be added to every role and config when any substantial change is applied to the role or config, all new roles and configs must include a.yamllint. The AgnosticD standard.yamllintconfiguration is shown below. See also Official yamllint documentation.extends: default rules: comments: require-starting-space: false comments-indentation: disable indentation: indent-sequences: consistent line-length: max: 120 allow-non-breakable-inline-mappings: true -
All tasks should be in YAML literal. No
foo=barinline notation. See here. -
Indentation is 2 white-spaces.
-
No in-line JSON format in Ansible
-
Avoid the use of
commandorshellmodule when specific Ansible module exists to do the same. If you must, please explain why.-
If you have to, prefer
commandmodule toshellmodule when possible. -
Use
k8sandk8s_infomodules as much as possible and notoccommand.
-
-
All tasks AND plays must have names.
-
Roles must have documented variables. This can be documented in either:
-
Role
defaults/main.yml(preferred) -
Role README file
-
Choose one or the other. If you are commenting your variables in the defaults, your README should just point to this file. Do not split your variable documentation across these.
-
-
Roles must have
meta/main.ymlwith author/contact information for support. -
Configs must have documented variables. This can be documented in either:
-
Config
default_vars*.yml(preferred) -
Config README file
-
Choose one or the other. If you are commenting your variables in the
default_vars.yml, your README should just point to this file. Do not split your variable documentation across these.
-
-
Be extra careful with external dependencies. Identify them and make sure the versions are pinned (use versions, tags, commit ID, etc.).
-
External Git repos
-
Libraries/Modules
-
Containers
-
-
In a role, ensure all variables names are prefixed with the role name to avoid name collisions with other roles.
-
Do not add
ignore_errorsto a task without justification. Prefer use offailed_whenif a condition is not an error.
13.3. About reviewing Pull Requests
-
Do not merge a PR after reviewing unless explicitely asked for
-
Approval and merging are different.
-
Other people might be reviewing at the same time, or want to review that PR
-
The PR might not be fully tested by the author yet
-
-
If a specific person was requested for review, don’t merge before that person reviewed, or before the request was canceled.
-
Take your time. If your PR is merged tomorrow instead of today, is it a big deal?
-
Pull request for urgent critical fix for production must be titled and labeled accordingly.
ExampleURGENT Fix config ansible-tower, update Windows AMI Ids for all regions Those images have been deleted and are not available anymore. This change, if applied, will update the AMI Ids in 'foobar' config for all region. closes #1234 labels: bug,urgent
-
Please use labels to categorize Pull Requests and Issues.
13.4. Ansible rules
# This
- name: Create a directory
  file:
    state: directory
    path: /tmp/deletethis

# Not this
- name: Create a directory
file: state=directory path=/tmpt/deletethis-
Module arguments should be indented two spaces
# This
- name: Create a directory
  file:
    state: directory
    path: /tmp/deletethis

# Not This
- name: Create a directory
  file:
      state: directory
path: /tmp/deletethis-
There should be a single line break between tasks
-
Tags should be in multi-line format and indented two spaces just like module arguments above
# This
- name: "Check hosts.equiv"
  stat:
    path: /etc/hosts.equiv
  register: hosts_equiv_audit
  always_run: yes
  tags:
    - tag1
    - tag2

# Not This
- name: "Check hosts.equiv"
  stat:
    path: /etc/hosts.equiv
  register: hosts_equiv_audit
  always_run: yes
tags: [tag1,tag2]-
Every task must be named and provide brief descriptions about the task being accomplished.
13.5. Git
Please follow the Git Style Guide.
Note: during the review process, you may add new commits to address review comments or change existing commits. However, before getting your PR merged, please squash commits to a minimum set of meaningful commits. This can be done directly in the github web UI.
If you’ve broken your work up into a set of sequential changes and each commit pass the tests on their own then that’s fine. If you’ve got commits fixing typos or other problems introduced by previous commits in the same PR, then those should be squashed before merging.
14. FAQ
14.1. Deployment Stages
14.1.1. Can I bypass one or more stages?
Yes, main.yml tags each stage, use --skip-tags
14.1.2. Where should I store credentails?
Never inside the repo. A common pattern is to store them in the home directoy
of the user who executes ansible-playbook. For example ~/.ssh for ssh keys,
~/.aws/credentials for AWS etc.
14.2. Cloud Providers
14.2.1. Can I bypass Stage 1 Cloud Providers completely?
Yes. See configs/linklight/README for an example and use --skip-tags=deploy_infrastructure
Galaxy and external roles
To use galaxy roles in your config, just do the following:
-
Create
requirements.ymlfile in the config directory, for example:ansible/configs/{{env_type}}/requirements.yml--- - src: geerlingguy.docker name: docker version: '2.5.1' -
Use the role in the playbooks
ansible/configs/{{env_type}}/pre_software.yml- name: Some play hosts: - myhosts become: true gather_facts: False tasks: - name: install docker include_role: name: docker
|
Note
|
Note that in the previous example, we use |
|
Important
|
Please use a pinned Make sure you use version pinning in
requirements.yml |
When you run Ansible Agnostic Deployer, it will automatically fetch and create the role in your config directory: ansible/configs/{{env_type}}/roles/docker for example.
15. Non-Galaxy external roles
Roles in requirements.yml don’t have to be in Galaxy, you can use any git repo.
requirements.yml with git repo---
# External role to setup grader host virtualenv and FTL grading infra
- src: https://github.com/redhat-gpte-devopsautomation/ftl-injector
name: ftl-injector
version: v0.716. Development workflow
During development, the roles will be deployed and get in your way git-wise. To avoid that, there is a rule in the top-level .gitignore to ignore those dynamic roles:
ansible/configs/*/roles
The convention is:
the "static" roles, those versioned in this repository, must live in
ansible/rolesand the "dynamic" roles in your config directoryansible/configs/{{env_type}}/roles.
|
Note
|
Dynamic roles are not pushed in git, only the requirements.yml file is versioned.
|
17. Multiple requirement files
Sometimes, for the same config, we need several requirements.yml. For example, one for PROD, one for DEV, etc.
You can create as many files as you want. When calling the playbook just override the requirements_path variable:
ansible-playbook main.yml -e requirements_path=ansible/configs/{{env_type}}/requirements-prod.yml [...]18. Misc
18.1. User Stories for AAD
-
A new product was acquired by Red Hat and the Architect wants to provide a new product as part of a deployable environment with AAD
-
It’s time consuming to put together environments. The Engineer wants to re-use deployment and configuration management for a product that’s already implemented in AAD to provide it integrated with another product.
-
There’s a new feature in OpenShift, and the Enineer wants to implement a feature in a product that will only impact a subset of the users of a product, and the engineers who rely on the product in their environments.
-
The SA wants to deliver a demo, and test their environment immediately before a demo, and clean up test data so the demo will be pristine.
-
The SA Manager wants needs to track effort and spending per opporunity, and wants a report of each her SA’s activities, and a cost-per-opportunity report.
-
The Enablement Architect wants to set a date to automatically destroy student envionrments.
-
The Enablement Architect wants to increase lab testing velocity by deploying environments via API.
-
The Enablement Architect wants to teach in a situation where two environments networked together, so multiple clusters can intercommunicate.
-
The Operators want a dashboard of environments as they launch, run, and are destroyed. Example: It’s difficult to respond to the question, "Are there any problems deploying or destroying any environments? Operators cannot quickly see the entire operational landscape of the system.
-
The Architect wants a new cloud service feature added to an environment. Example: New class requirements demand object storage for environemtns. So, S3 buckets with quotas need to be setup for each environment.
-
The SA wants to use AAD to create a demo of Quay for their customer from a basic deployment, as an upstream of a new OpenShift Cluster with Jenkins CI, a test Java application and user policies for dev/test/qa/admin/security. Quay will use Clair to check images. There will be geo-replication of the underlying Quay datastore (S3 or the like).