Troubleshooting
This section describes common troubleshooting procedures.
Additional resources:
- Upstream document for improving debug experience
- MTC Debug flowchart (in progress)
Debugging MTC resources
MTC custom resources
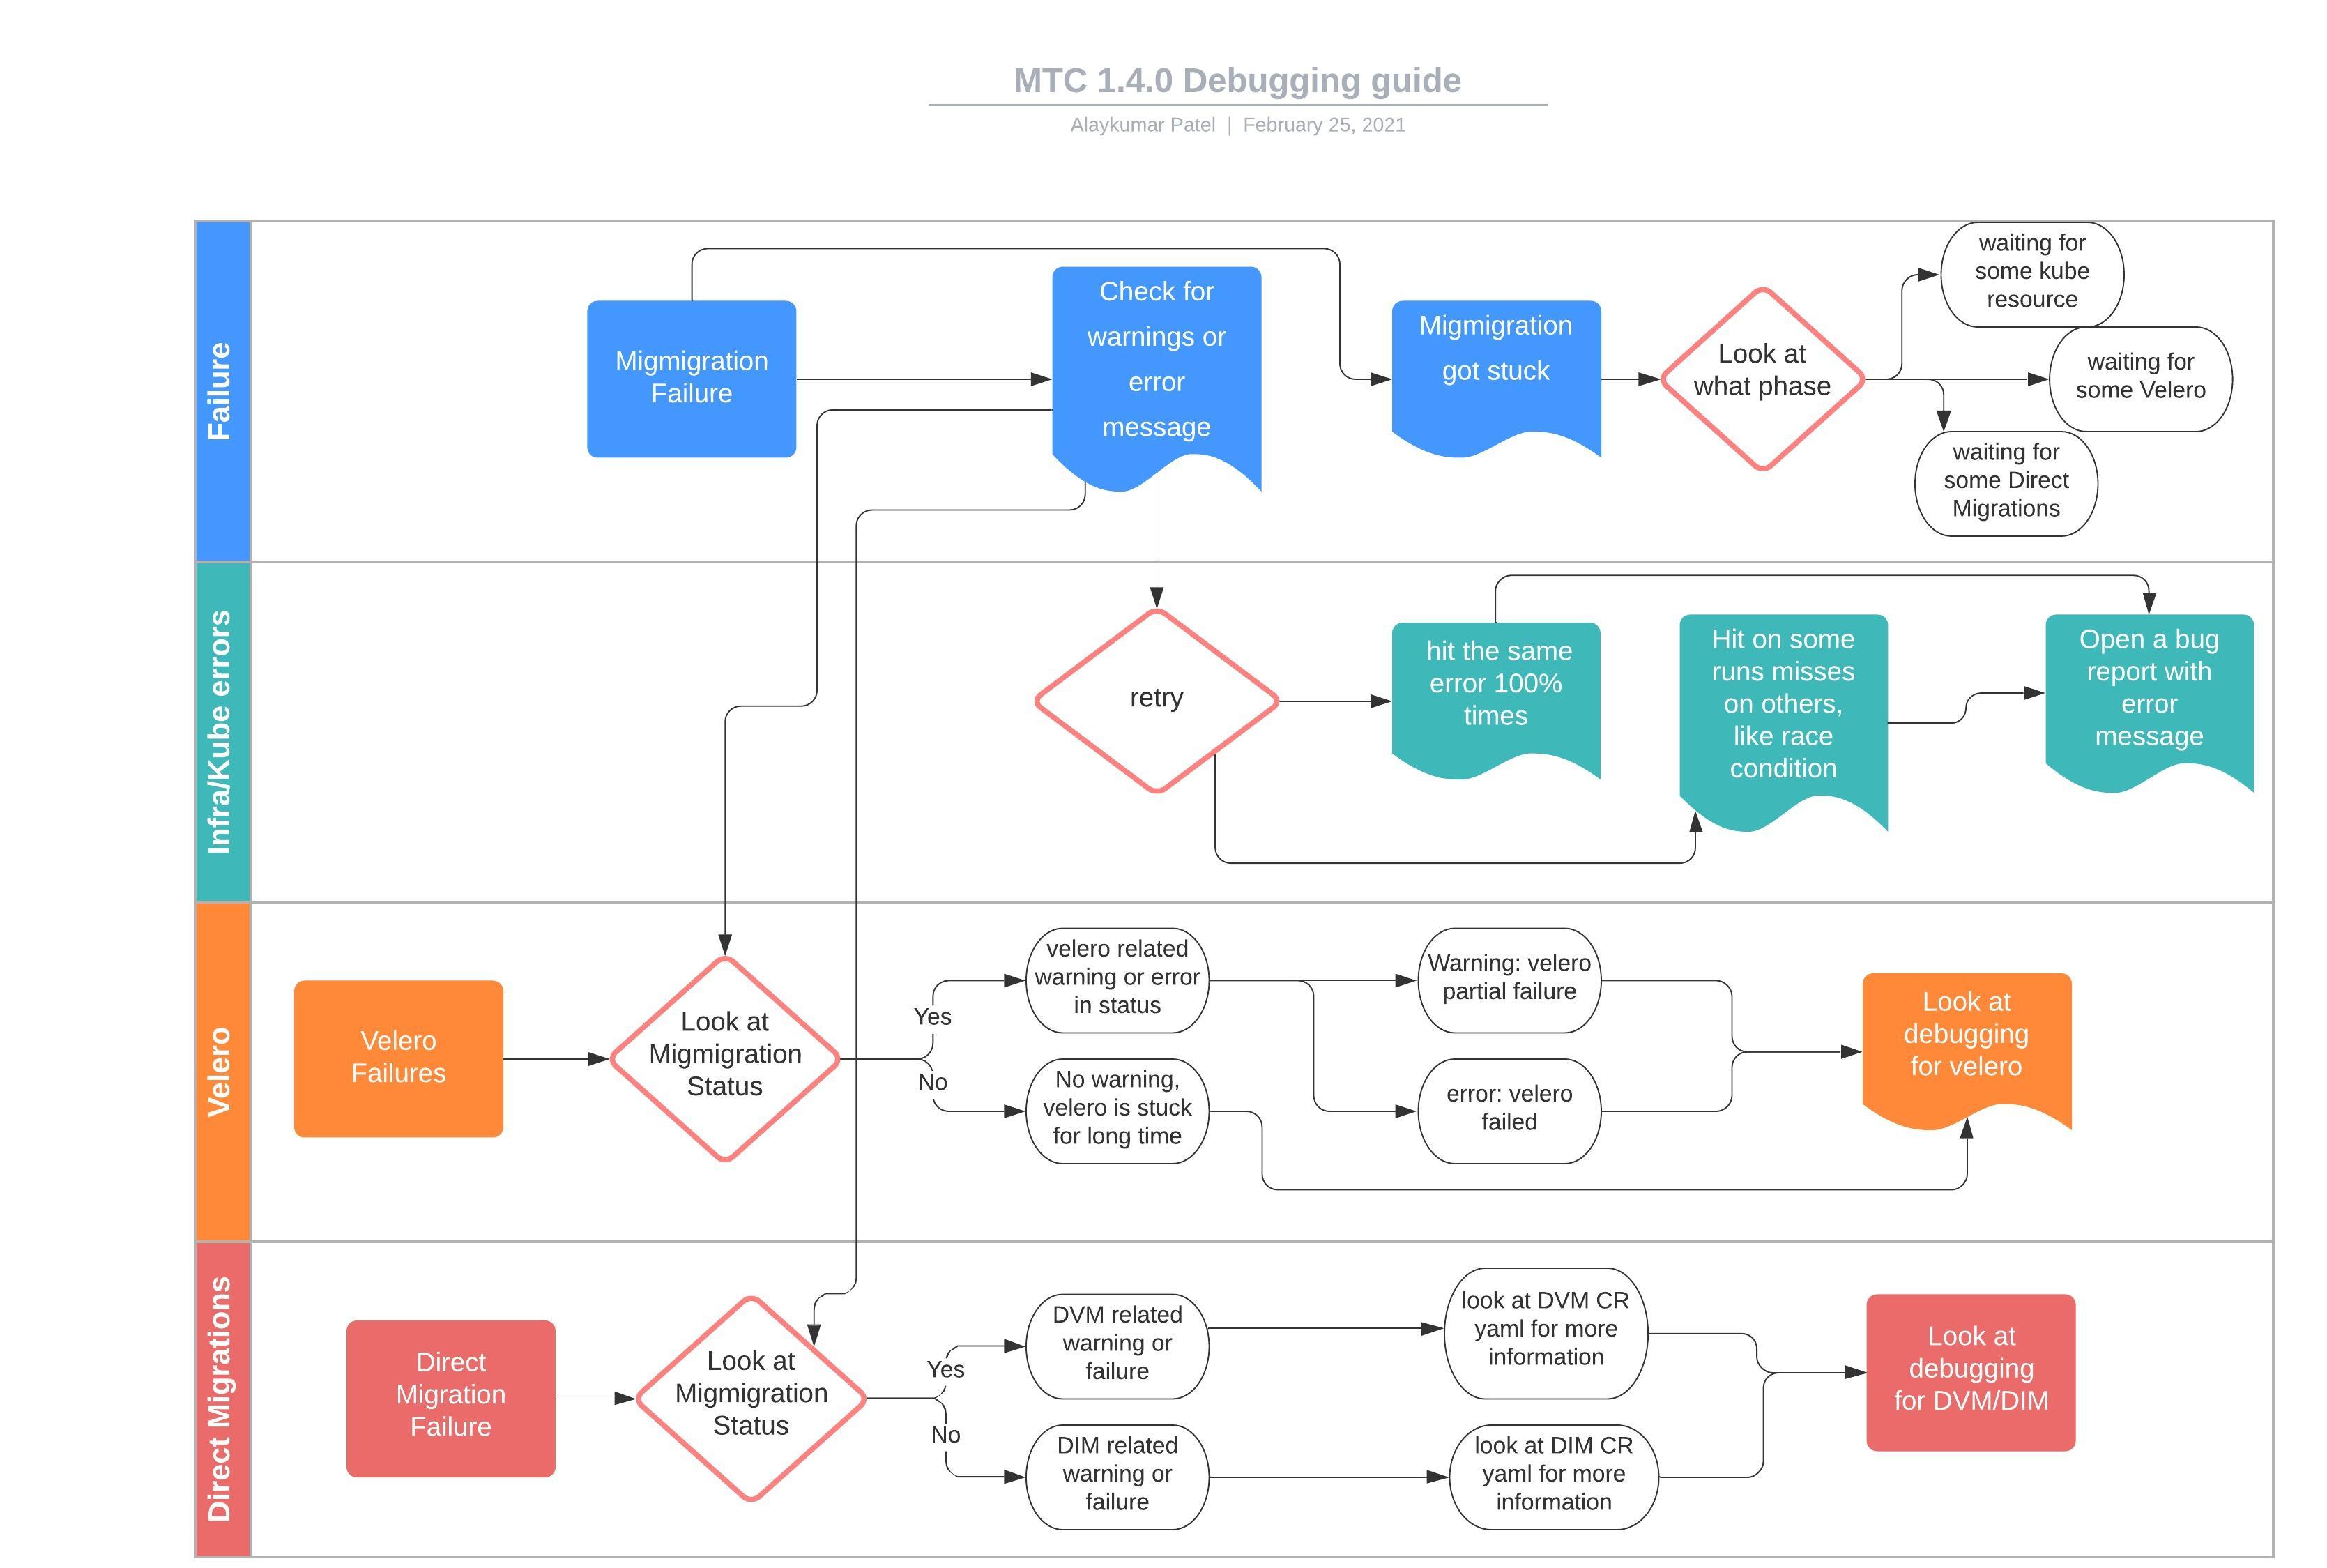
The following diagram describes the MTC debug flow.
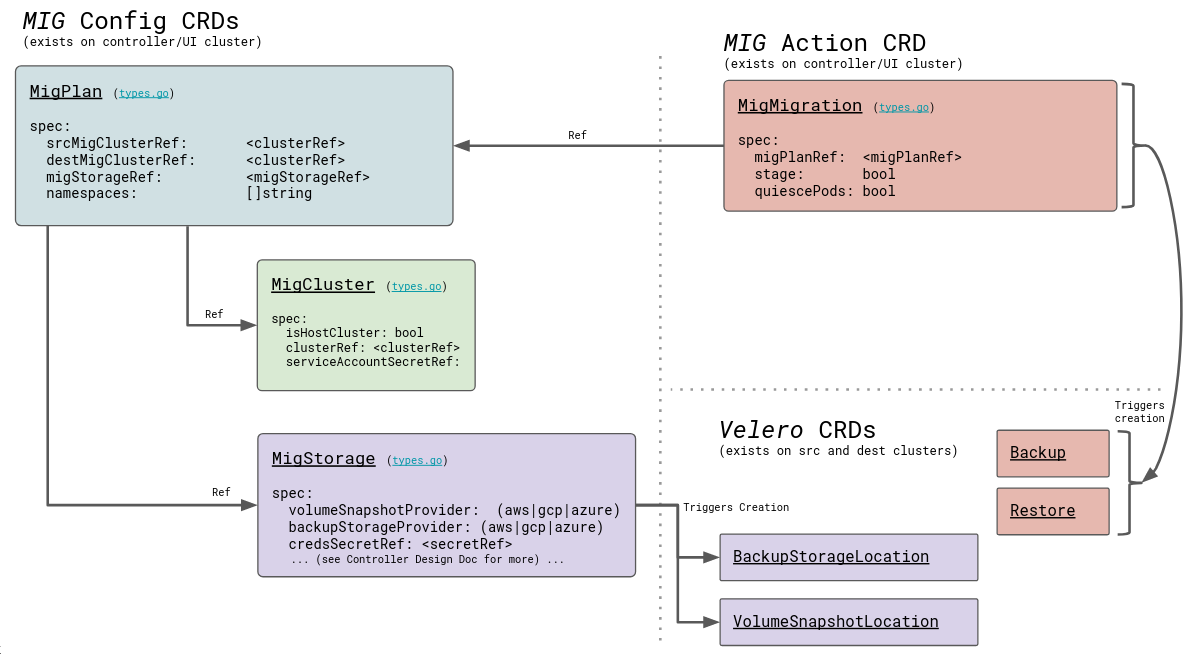
The following diagram describes the MTC custom resources (CRs). Each object is a standard Kubernetes CR.
You can manage the MTC resources with the standard create, read, update, and delete operations using the kubectl and oc clients or directly, using the web interface.
Debugging MTC resources using the web console
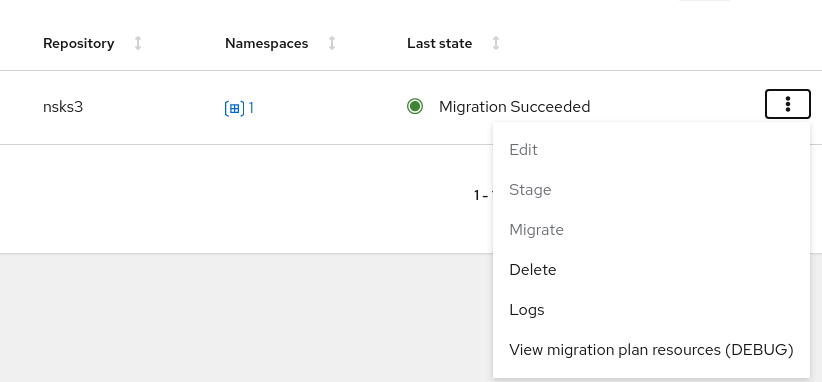
You can view the resources of a migration plan in the MTC web console:
-
Click the Options menu next to a migration plan and select View migration plan resources.
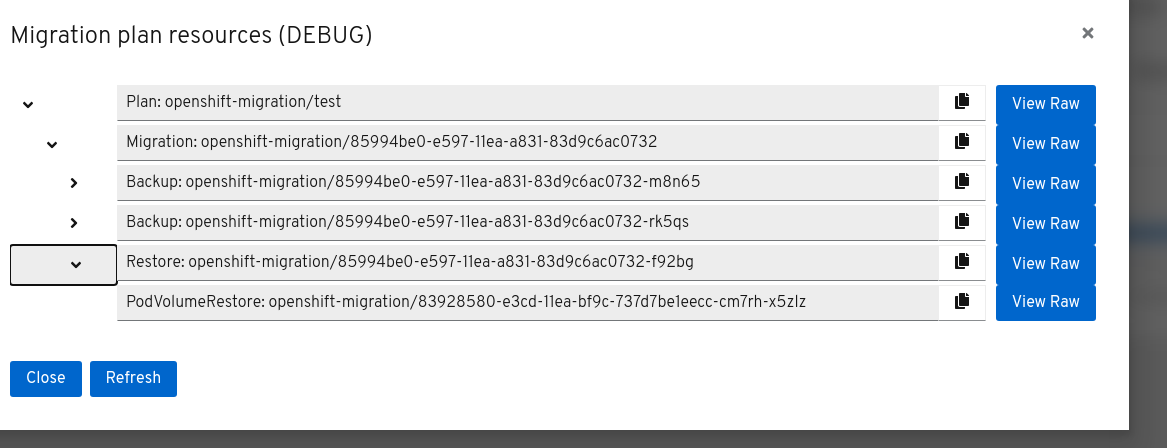
The migration plan resources are displayed as a tree.
-
Click the arrow of a Backup or Restore resource to view its pods.
-
Click the Copy button of a pod to copy the
oc getcommand to your clipboard and paste the command on the command line. -
Click View Raw to inspect a pod.
The resource is displayed in JSON format.
Usually the objects that you should examine depend on the stage at which the migration failed. The MTC debug flowchart provides information about which resources are relevant, depending on this failure stage.
Stage migrations have one Backup and one Restore resource.
Final migrations have two Backup and two Restore resources. The first Backup resource captures the original, unaltered state of the application and its Kubernetes objects. This Backup is the source of truth.
Then, the application is quiesced and a second Backup captures the storage-related resources (PVs, PVCs, data).
The first Restore restores these storage objects on the target cluster. The final Restore restores the original application Backup to the target cluster.
Debugging migration resources from the command line
You can view the migration debug tree and query specific label selectors.
- To view all
migmigrationresources associated with thetestmigration plan:$ oc get migmigration -l 'migration.openshift.io/migplan-name=test'Example output
NAME                                  READY  PLAN  STAGE  ITINERARY  PHASE
09a8bf20-fdc5-11ea-a447-cb5249018d21         test  false  Final      Completed
The columns display the associated plan name, itinerary step, and phase.
- To view all completed
migmigrationresources associated with thetestmigration plan:$ oc get migmigration -l 'migration.openshift.io/migplan-name=test' -o\ go-template-file=./go-cli-templates/migmigration-completed-list.templateExample output
Name:       51886050-6d52-11eb-98e7-b515603f1bc7
Migplan:    test
Result:     SucceededWithWarnings

Name:       b4d045f0-6d58-11eb-98e7-b515603f1bc7
Migplan:    test
Result:     SucceededWithWarnings
The
Resultparameter indicates a status ofSucceeded,SucceededWithWarnings, orFailed. - To view the warnings of all completed
migmigrationresources associated with thetestmigration plan:$ oc get migmigration -l 'migration.openshift.io/migplan-name=test' -o \ go-template-file=go-cli-templates/migmigration-display-warning-list.templateExample output
Name: 51886050-6d52-11eb-98e7-b515603f1bc7 Migplan: test Warning: DirectVolumeMigrationFailed Message: DirectVolumeMigration (dvm): openshift-migration/51886050-6d52-11eb-98e7-b515603f1bc7-z9zfj failed. See in dvm status.Errors errors: <no value> Name: b4d045f0-6d58-11eb-98e7-b515603f1bc7 Migplan: test Warning: DirectVolumeMigrationFailed Message: DirectVolumeMigration (dvm): openshift-migration/b4d045f0-6d58-11eb-98e7-b515603f1bc7-4c894 failed. See in dvm status.Errors errors: <no value> - To list all
Backupresources:$ oc get backup -n openshift-migrationExample output
NAME                                   AGE
88435fe0-c9f8-11e9-85e6-5d593ce65e10   6m42s
You can use the same command to view
Restoreresources. - To inspect a
Backupresource:$ oc describe backup 88435fe0-c9f8-11e9-85e6-5d593ce65e10 -n openshift-migration - To list failed migrations caused by direct volume migration failures:
$ oc get dvm -l migmigration=<uid>Example Output
NAME AGE b4d045f0-6d58-11eb-98e7-b515603f1bc7-4c894 5d21h - To list the direct volume migration failures and their causes:
$ oc get dvm -l migmigration=<uid> \
-o go-template-file=go-cli-templates/dvm-display-failure-list.template
Example Output
Name:       b4d045f0-6d58-11eb-98e7-b515603f1bc7-4c894

    State:  Failed
    Phase:  WaitForRsyncClientPodsCompleted
    Message:        The migration has failed.  See: Errors.

errors:     [One or more pods are in error state]
See Viewing migration custom resources for more information.
Debugging backup and restore resources with the Velero CLI
You can debug backup and restore resources with the Velero command line interface (CLI). The Velero CLI is included in the velero pod.
Velero CLI examines lower-level information in the object storage associated with a Backup or Restore resource. This information can reveal why a resource was not restored or why a Velero operation failed.
Velero CLI commands
Syntax
Velero CLI commands use the following syntax:
$ oc exec $(oc get pods -n openshift-migration -o name | grep velero) -- ./velero <resource> <command> <resource_id>
You can specify
velero-<pod> -n openshift-migrationin place of$(oc get pods -n openshift-migration -o name | grep velero).
For a full list of commands, run velero --help:
$ oc exec $(oc get pods -n openshift-migration -o name | grep velero) -- ./velero --help
Velero describe command
The describe command provides a summary of warnings and errors associated with a Velero resource:
velero <resource> describe <resource_id>
Example
$ oc exec $(oc get pods -n openshift-migration -o name | grep velero) -- ./velero backup describe 0e44ae00-5dc3-11eb-9ca8-df7e5254778b-2d8ql
Velero logs command
The logs command provides a lower level output of the logs associated with a Velero resource:
velero <resource> logs <resource_id>
Example
$ oc exec $(oc get pods -n openshift-migration -o name | grep velero) -- ./velero restore logs ccc7c2d0-6017-11eb-afab-85d0007f5a19-x4lbf
Debugging a partial failure with the Velero logs command
You can debug a partial failure by using the Velero logs command to examine the restore logs. A partial failure occurs when Velero encounters an issue but the issue does not cause a migration to fail.
For example, if a custom resource (CR) cannot be restored because the custom resource definition (CRD) is missing or is a different version on the target cluster, Velero logs the issue and then processes the rest of the objects in the Backup resource.
In the future, Velero error reporting will be improved. See MIG-353: Enhance Velero error reporting so problems that cause partial failures (and even full failures) are more visible in structured way
Debug example
The following example describes how to debug a partially failed restore caused by GVK incompatibility. The CRD version on the source cluster differs from the CRD version on the target cluster. See the GVK incompatibility exercise for details.
- Obtain the
MigMigrationinstance associated with the partial failure:oc get migmigration ccc7c2d0-6017-11eb-afab-85d0007f5a19 -o yamlExample output
status: conditions: - category: Warn durable: true lastTransitionTime: "2021-01-26T20:48:40Z" message: 'Final Restore openshift-migration/ccc7c2d0-6017-11eb-afab-85d0007f5a19-x4lbf: partially failed on destination cluster' status: "True" type: VeleroFinalRestorePartiallyFailed - category: Advisory durable: true lastTransitionTime: "2021-01-26T20:48:42Z" message: The migration has completed with warnings, please look at `Warn` conditions. reason: Completed status: "True" type: SucceededWithWarnings - Check the status of the
restoreresource by running thedescribecommand:$ oc exec $(oc get pods -n openshift-migration -o name | grep velero) -n openshift-migration -- ./velero restore describe ccc7c2d0-6017-11eb-afab-85d0007f5a19-x4lbfExample output
Phase: PartiallyFailed (run 'velero restore logs ccc7c2d0-6017-11eb-afab-85d0007f5a19-x4lbf' for more information) Errors: Velero: <none> Cluster: <none> Namespaces: gvk-demo: error restoring gvkdemoes.konveyor.openshift.io/gvk-demo/gvk-demo: the server could not find the requested resource - Check the
restorelogs by running thelogscommand:$ oc exec $(oc get pods -n openshift-migration -o name | grep velero) -n openshift-migration -- ./velero restore logs ccc7c2d0-6017-11eb-afab-85d0007f5a19-x4lbfExample output
time="2021-01-26T20:48:37Z" level=info msg="Attempting to restore GvkDemo: gvk-demo" logSource="pkg/restore/restore.go:1107" restore=openshift-migration/ccc7c2d0-6017-11eb-afab-85d0007f5a19-x4lbf time="2021-01-26T20:48:37Z" level=info msg="error restoring gvk-demo: the server could not find the requested resource" logSource="pkg/restore/restore.go:1170" restore=openshift-migration/ccc7c2d0-6017-11eb-afab-85d0007f5a19-x4lbfThe
restorelog error message,the server could not find the requested resource, indicates the cause of the partially failed migration.
Error messages
CA certificate error when logging in to the MTC console for the first time
The following error message might appear when you log in to the MTC console for the first time:
A certificate error has occurred, likely caused by using self-signed CA certificates in one of the clusters. Navigate to the following URL and accept the certificate:
`https://www.example.com:6443/.well-known/oauth-authorization-server`.

If an "Unauthorized" message appears after you have accepted the certificate, refresh the web page.

To fix this issue permanently, add the certificate to your web browser's trust store.
Possible causes are self-signed certificates or network access issues.
Self-signed CA certificates:
- You can navigate to the
oauth-authorization-serverURL and accept the certificate. - You can add self-signed certificates for the API server, OAuth server, and routes to your web browser's trusted store.
Network access:
- You can inspect the elements of the MTC console with your browser's web inspector to view the network connections.
-
MTC 1.3.1 and earlier: The MTC console performs OAuth authentication on the client side.
The console requires uninterrupted network access to the API server and the OAuth server.
-
MTC 1.3.2 and later: OAuth authentication is performed on the backend.
The console requires uninterrupted network access to the Node.js server, which provides the JavaScript bundle and performs OAuth authentication, and the API server. See BZ#1878824.
Connection time-out after accepting CA certificate
If you acce[t] a self-signed certificate and a blank page appears, followed by a Connection has timed out message, the likely cause is a web proxy blocking access to the OAuth server.
Configure the web proxy configuration to allow access to the oauth-authorization-server URL. See BZ#1890675.
Using must-gather
You can use the must-gather tool to collect information for troubleshooting or for opening a customer support case on the Red Hat Customer Portal. The openshift-migration-must-gather-rhel8 image collects migration-specific logs and Custom Resource data that are not collected by the default must-gather image.
Run the must-gather command on your cluster:
$ oc adm must-gather --image=openshift-migration-must-gather-rhel8:v1.3.0
The must-gather tool generates a local directory that contains the collected data.
Direct volume migration fails to complete
For direct volume migrations, we create a few dependencies:
- Transfer pod on the destination cluster in target namespace. This pod has rsync daemon container and stunnel container
- Stunnel service on the destination cluster in target namespace, this creates the networking presence for the stunnel container in kubernetes
- Stunnel route on the destination cluster in target namespace, this creates a route to be exposed on the internet
- Stunnel pod on the source cluster in source namespace, this connects to the target stunnel container in transfer pod through stunnel route on the target namespace
- Rsync client pods on the source cluster in source namespace, this runs the actual rsync command for moving the PVC data.
If direct volume migration fails to complete, it could be one of the following buckets of errors:
-
Error in creating dependencies: If creating any of the above dependencies fails, it could lead to a failure. The error message will be present in DVM status and in the errors fields. Use the dvm failure list command to find this.
-
Stuck in waiting for dependencies to be healthy: It could be the case that the pods on either source or destination is not running or the route is not admitted. In both these cases, DVM is hang until the pod is running or route is admitted. When the pods are stuck in a non-healthy state, you will find a Warning in 10 mins of DVM being stuck here. Use the dvm command to see warning on the dvm status
-
Rsync exits with error: this happens when all the dependencies are met and healthy and the rysnc fail because of some reason. The dvm controller does not clean up the failed rsync client pods so the logs can be inspected.
Example of debugging with dependency pod in pending state:
A very likely cause of direct volume migration failing to complete is the Rsync transfer pods on the target cluster remain in a Pending state.
MTC migrates namespaces with all annotations in order to preserve security context constraints and scheduling requirements. During direct volume migration, MTC creates Rsync transfer pods on the target cluster in the namespaces that were migrated from the source cluster. If the target cluster does not have the same node labels as the source cluster, the Rsync transfer pods cannot be scheduled.
You can check the migmigration CR status:
$ oc describe migmigration 88435fe0-c9f8-11e9-85e6-5d593ce65e10 -n openshift-migration
The output displays the following status message:
Some or all transfer pods are not running for more than 10 mins on destination cluster
To resolve this issue, perform the following steps:
- Obtain the value of the
openshift.io/node-selectorannotation of the migrated namespaces on the source cluster:$ oc get namespace -o yaml - Add the
openshift.io/node-selectorannotation to each migrated namespace on the target cluster:apiVersion: v1 kind: Namespace metadata: annotations: openshift.io/node-selector: "region=east" ... - Re-run the migration plan.
Previewing metrics on local Prometheus server
You can use must-gather to create a metrics data directory dump from the last day:
$ oc adm must-gather --image quay.io/konveyor/must-gather:latest -- /usr/bin/gather_metrics_dump
You can view the data with a local Prometheus instance.
Performance metrics
For information about the metrics recorded by the MTC controller, see the mig-operator documentation.
This documentation includes useful queries for performance monitoring.
Cleaning up a failed migration
Deleting resources
Ensure that stage pods are cleaned up. If a migration fails during stage or copy, the stage pods are retained to allow debugging. Before retrying a migration, you must delete the stage pods manually.
Unquiescing an application
If your application was quiesced during migration, you should unquiesce it by scaling it back to its initial replica count.
This can be done manually by editing the deployment primitive (Deployment, DeploymentConfig, etc.) and setting the spec.replicas field back to its original, non-zero value:
$ oc edit deployment <deployment_name>
Alternatively, you can scale your deployment with the oc scale command:
$ oc scale deployment <deployment_name> --replicas=<desired_replicas>
Labels for premigration settings
When a source application is quiesced during migration, MTC adds a label indicating the original replica count to the deployment resource:
apiVersion: extensions/v1beta1
kind: Deployment
metadata:
  annotations:
    deployment.kubernetes.io/revision: "1"
    migration.openshift.io/preQuiesceReplicas: "1"
Deleting the MTC Operator and resources
The following procedure removes the MTC Operator and cluster-scoped resources:
-
Delete the Migration Controller and its resources:
$ oc delete migrationcontroller <resource_name>Wait for the MTC Operator to finish deleting the resources.
-
Uninstall the MTC Operator:
- OpenShift 4: Uninstall the Operator in the web console or by running the following command:
$ oc delete ns openshift-migration- OpenShift 3: Uninstall the operator by deleting it:
$ oc delete -f operator.yml
-
Delete the cluster-scoped resources:
- Migration custom resource definition:
$ oc delete $(oc get crds -o name | grep 'migration.openshift.io') - Velero custom resource definition:
$ oc delete $(oc get crds -o name | grep 'velero') - Migration cluster role:
$ oc delete $(oc get clusterroles -o name | grep 'migration.openshift.io') - Migration-operator cluster role:
$ oc delete clusterrole migration-operator - Velero cluster role:
$ oc delete $(oc get clusterroles -o name | grep 'velero') - Migration cluster role bindings:
$ oc delete $(oc get clusterrolebindings -o name | grep 'migration.openshift.io') - Migration-operator cluster role bindings:
$ oc delete clusterrolebindings migration-operator - Velero cluster role bindings:
$ oc delete $(oc get clusterrolebindings -o name | grep 'velero')
- Migration custom resource definition: